使用 Hexo 搭建博客
安装部署
安装NodeJs: https://nodejs.org/en/download
安装Git: https://git-scm.com/download/win
安装 hexo,输入以下命令
npm install hexo-cli -g   # 安装hexo脚手架
hexo init blog            # blog是自定义文件夹名字
cd blog
hexo server    # 启动hexo
注意:网络问题可能有点慢。
安装插件(看个人情况安装)
npm install hexo-renderer-pug hexo-renderer-stylus --save # 必须安装,不然无法运行,会报错
npm install https://github.com/BluefoxQAQ/hexo-asset-image.git --save # 插入图片用的插件
npm install hexo-generator-search --save # 安装搜索插件
# 主题使用本地静态js,cdn配置相关,可选。需要和主题版本最新,否则可能报错。见下文butterfly主题配置cdn
npm install hexo-butterfly-extjs --save
npm install hexo-deployer-git --save  # 安装github部署插件
npm install hexo-deployer-ftpsync --save  # 安装FTP部署插件
npm install https://github.com/BluefoxQAQ/hexo-deployer-ali-oss.git --save # 阿里云OSS一键部署插件
安装 butterfly 主题:在根目录运行命令
git clone -b master https://gitee.com/immyw/hexo-theme-butterfly.git themes/butterfly
官方文档: https://butterfly.js.org/posts/21cfbf15/
hexo 简单命令
hexo new "文章名字"       # 新建文章
hexo new post -p /后端/test.md # 在指定目录下新建文章
hexo new page "页面名字"  # 新建页面
hexo generate            # 生成静态页面至public目录
hexo server              # 开启预览访问端口(默认端口4000,'ctrl + c'关闭server)
hexo s -p 5000           # 更换端口
hexo deploy              # 上传部署,大部分人是部署到GitHub,需要配置
hexo clean               # 清除缓存
hexo help                # 查看帮助
hexo version             # 查看Hexo的版本
缩写命令:
hexo n == hexo new
hexo g == hexo generate
hexo s == hexo server
hexo d == hexo deploy
配置文件
hexo 配置
# Site
title: 蓝狐狸
subtitle: Hello and welcome
description: '我很懒'
keywords:
author: 蓝狐狸
language: zh-CN
timezone: ''

# 设置URL
url: https://www.lanhuli.top
# 自定义文章链接,这里使用hash值
permalink: :hash.html
# 资源文件夹,创建文章时自动创建同名文件夹
post_asset_folder: true
# 更换主题
theme: butterfly

使用ftp上传
deploy:
  type: ftpsync #上传方式,固定ftpsync
  host: xxx.xxx.xxx.xxx #ftp地址
  user: ****	#帐号
  pass: ****	#密码
  remote: /webroot #上传至哪个目录
  port: 21	#端口
butterfly 主题配置
顶部导航栏
menu:
  首页: / || fas fa-home
  # 具体分类||fas fa-archive:
    # web: /categories/web前端/ || fas fa-music
  标签: /tags/ || fas fa-tags
  分类: /categories/ || fas fa-folder-open
  # List||fas fa-list:
    # Music: /music/ || fas fa-music
    # Movie: /movies/ || fas fa-video
  # Link: /link/ || fas fa-link
  关于: /about/ || fas fa-heart
代码块:只修改样式为 mac,其它默认即可
highlight_theme: mac
网站图标:默认使用的是butterfly主题的图标,在 \blog\themes\butterfly\source\img 目录下
# Favicon(網站圖標)
favicon: /img/favicon.png
头像设置
avatar:
  img: /img/avatar.jpg    # 自定义图片
  effect: false   # 不开启旋转
主页背景图片:
# The banner image of home page
index_img: /img/background.png
主页侧边栏设置(aside)
# aside (側邊欄)
# --------------------------------------
aside:
  enable: true
  hide: false
  button: true
  mobile: true # display on mobile
  position: right # left or right,显示在右边
  display:
    archive: true
    tag: true
    category: true
  card_author:
    enable: true
    description:
    button:
      enable: false  # 默认true,不喜欢,改为false
      icon: fab fa-github
      text: Follow Me
      link: https://github.com/xxxxxx
  card_announcement:
    enable: true
    content: 随便写写,随缘更新。
  card_recent_post:
    enable: true  # 最新文章
    limit: 5 # if set 0 will show all
    sort: date # date or updated
    sort_order: # Don't modify the setting unless you know how it works
  card_categories:
    enable: false  # 显示所有分类
    limit: 8 # if set 0 will show all
    expand: none # none/true/false
    sort_order: # Don't modify the setting unless you know how it works
  card_tags:
    enable: false  # 显示所有标签
    limit: 40 # if set 0 will show all
    color: false
    orderby: random # Order of tags, random/name/length
    order: 1 # Sort of order. 1, asc for ascending; -1, desc for descending
    sort_order: # Don't modify the setting unless you know how it works
  card_archives:
    enable: false  # 显示归档
    type: monthly # yearly or monthly
    format: MMMM YYYY # eg: YYYY年MM月
    order: -1 # Sort of order. 1, asc for ascending; -1, desc for descending
    limit: 8 # if set 0 will show all
    sort_order: # Don't modify the setting unless you know how it works
  card_webinfo:
    enable: false  # 显示网站咨询
    post_count: true
    last_push_date: true
    sort_order: # Don't modify the setting unless you know how it works
  card_post_series:
    enable: true  # 排序
    orderBy: 'date' # Order by title or date
    order: -1 # Sort of order. 1, asc for ascending; -1, desc for descending
顶部图片:直接透明化
# If the banner of page not setting, it will show the top_img
default_top_img: Transparent
404 页面
error_404:
  enable: true  # 开启主题自带的404页面
  subtitle: 'Page Not Found'
  background: https://i.loli.net/2020/05/19/aKOcLiyPl2JQdFD.png
文章目录设置
# toc (目錄)
toc:
  post: true  # 文章页是否显示 TOC
  page: false  # 普通页面是否显示 TOC
  number: true # 是否显示章节数
  expand: true  # 是否展开 TOC
  style_simple: true # for post  简洁模式(侧边栏只显示 TOC, 只对文章页有效 )
  scroll_percent: true # 是否显示滚动进度百分比
文章过期提醒:以更新时间为基准
# Displays outdated notice for a post (文章過期提醒)
noticeOutdate:
  enable: true
  style: flat # style: simple/flat
  limit_day: 365 # When will it be shown
  position: top # position: top/bottom
  message_prev: 这篇文章距离更新已经过了
  message_next: 天,其中某些内容可能已经过时了。
  # 这篇文章距离更新已经过了 365 天,其中某些内容可能已经过时了。
文章分享
# 注意:只能二选一
# Share.js
# https://github.com/overtrue/share.js
sharejs:
  enable: true  # 默认true,不喜欢分享,可以设置为false
  sites: facebook,twitter,wechat,weibo,qq

# AddToAny
# https://www.addtoany.com/
addtoany:
  enable: false  # 同上
  item: facebook,twitter,wechat,sina_weibo,facebook_messenger,email,copy_link
设置网站背景
background: url(/img/background.png) # 完美
footer_bg: Transparent
动态彩带背景:没开启
# Fluttering Ribbon (動態彩帶)
canvas_fluttering_ribbon:
  enable: false
  mobile: false
鼠标点击特效:看你喜欢哪个,我用的烟火特效
fireworks:
  enable: true
  zIndex: 9999 # -1 or 9999
  mobile: false
页面美化:没开启,个人觉得不开也挺好的。
# Beautify (美化頁面顯示)
beautify:
  enable: false
  field: post # site/post
  title-prefix-icon: # '\f0c1'
  title-prefix-icon-color: # '#F47466'
全局字体设置
# Global font settings
# Don't modify the following settings unless you know how they work (非必要不要修改)
font:
  global-font-size:
  code-font-size:
  font-family: Microsoft YaHei
  code-font-family: consolas
主页 subtitle
# the subtitle on homepage (主頁subtitle)
subtitle:
  enable: true
  # Typewriter Effect (打字效果)
  effect: true
  # Customize typed.js (配置typed.js)
  # https://github.com/mattboldt/typed.js/#customization
  typed_option:
  # source 調用第三方服務
  # source: false 關閉調用
  # source: 1  調用一言網的一句話(簡體) https://hitokoto.cn/
  # source: 2  調用一句網(簡體) https://yijuzhan.com/
  # source: 3  調用今日詩詞(簡體) https://www.jinrishici.com/
  # subtitle 會先顯示 source , 再顯示 sub 的內容
  source: false
  # 如果關閉打字效果,subtitle 只會顯示 sub 的第一行文字
  sub:
    - 生活并不会总被预料,有意外才是生活。
CDN 更换
网站有时候样式显示不出来,可能是 CDN 挂了。默认是jsdelivr,可以改成unpkg
# CDN
# Don't modify the following settings unless you know how they work
# 非必要請不要修改
CDN:
  # The CDN provider of internal scripts (主題內部 js 的 cdn 配置)
  # option: local/jsdelivr/unpkg/cdnjs/custom
  # Dev version can only choose. ( dev版的主題只能設置為 local )
  internal_provider: local

  # The CDN provider of third party scripts (第三方 js 的 cdn 配置)
  # option: local/jsdelivr/unpkg/cdnjs/custom
  # when set it to local, you need to install hexo-butterfly-extjs
  third_party_provider: unpkg
如果使用本地资源,需要改为 third_party_provider: local,同时安装 hexo-butterfly-extjs 插件。
注意:hexo-butterfly-extjs 插件对 butterfly 主题版本有一定要求,建议使用最新版本主题或安装低版本插件,否则运行 hexo g 命令时报错。
多端同步问题
在多台电脑上编辑博客内容,可以用git分支进行同步,但是个人觉得每次都要pull和push有点麻烦。我个人使用坚果云同步 source 目录,配置文件和模板文件上传云盘,至于 hexo 环境和主题只需要在开始安装一次就行。
当我更换新电脑时,重新安装hexo环境、主题、插件,把配置文件从云盘下载到根目录,在用坚果云将 source 目录同步过来就行了。这样,不管在哪一台电脑上编辑文章,坚果云会自动帮我同步至最新。
迁移到 Hugo
从 hexo 转到 hugo
hugo 的环境安装比 hexo 要简单,hugo 下个二进制文件就行,hexo 还要下载 nodeJS 和一堆 npm 包,而且下载的时候因为网络问题还慢,所以就换了 hugo。
之前用hexo时用的主题是butterfly,配置起来挺简单,文档全,也挺好看的。换了hugo之后,找了不少主题,最终选择用了 FixIt
FixIt 主题很简洁,简单,够用,而且还有中文文档,上手挺快的。
Hugo 常用命令
hugo version  # 查看版本
hugo env      # 版本和环境详细信息

# 创建项目
hugo new site hugo-demo  # 会在当前文件夹下创建 hugo-demo 文件夹
##### hugo-demo文件夹下的目录结构
├─config.toml # 配置文件
├─archetypes
│      default.md
├─content     # 存放博客和单页文章
├─data        # 存放其他数据
├─layouts
├─public      # 博客构建后的静态文件路径
├─static      # 用于存放静态资源
└─themes      # 主题路径
#####

# 进入 hugo-demo 文件夹
hugo new posts/my-first-post.md  # 文章在\content\posts里面


# 启动
hugo server -D  # 显示草稿文章
Hugo 使用 GitHub Actions 自动部署
创建两个仓库,一个用来放 Hugo 生成的静态文件(public),一个用来放 Hugo 的博客项目(private)
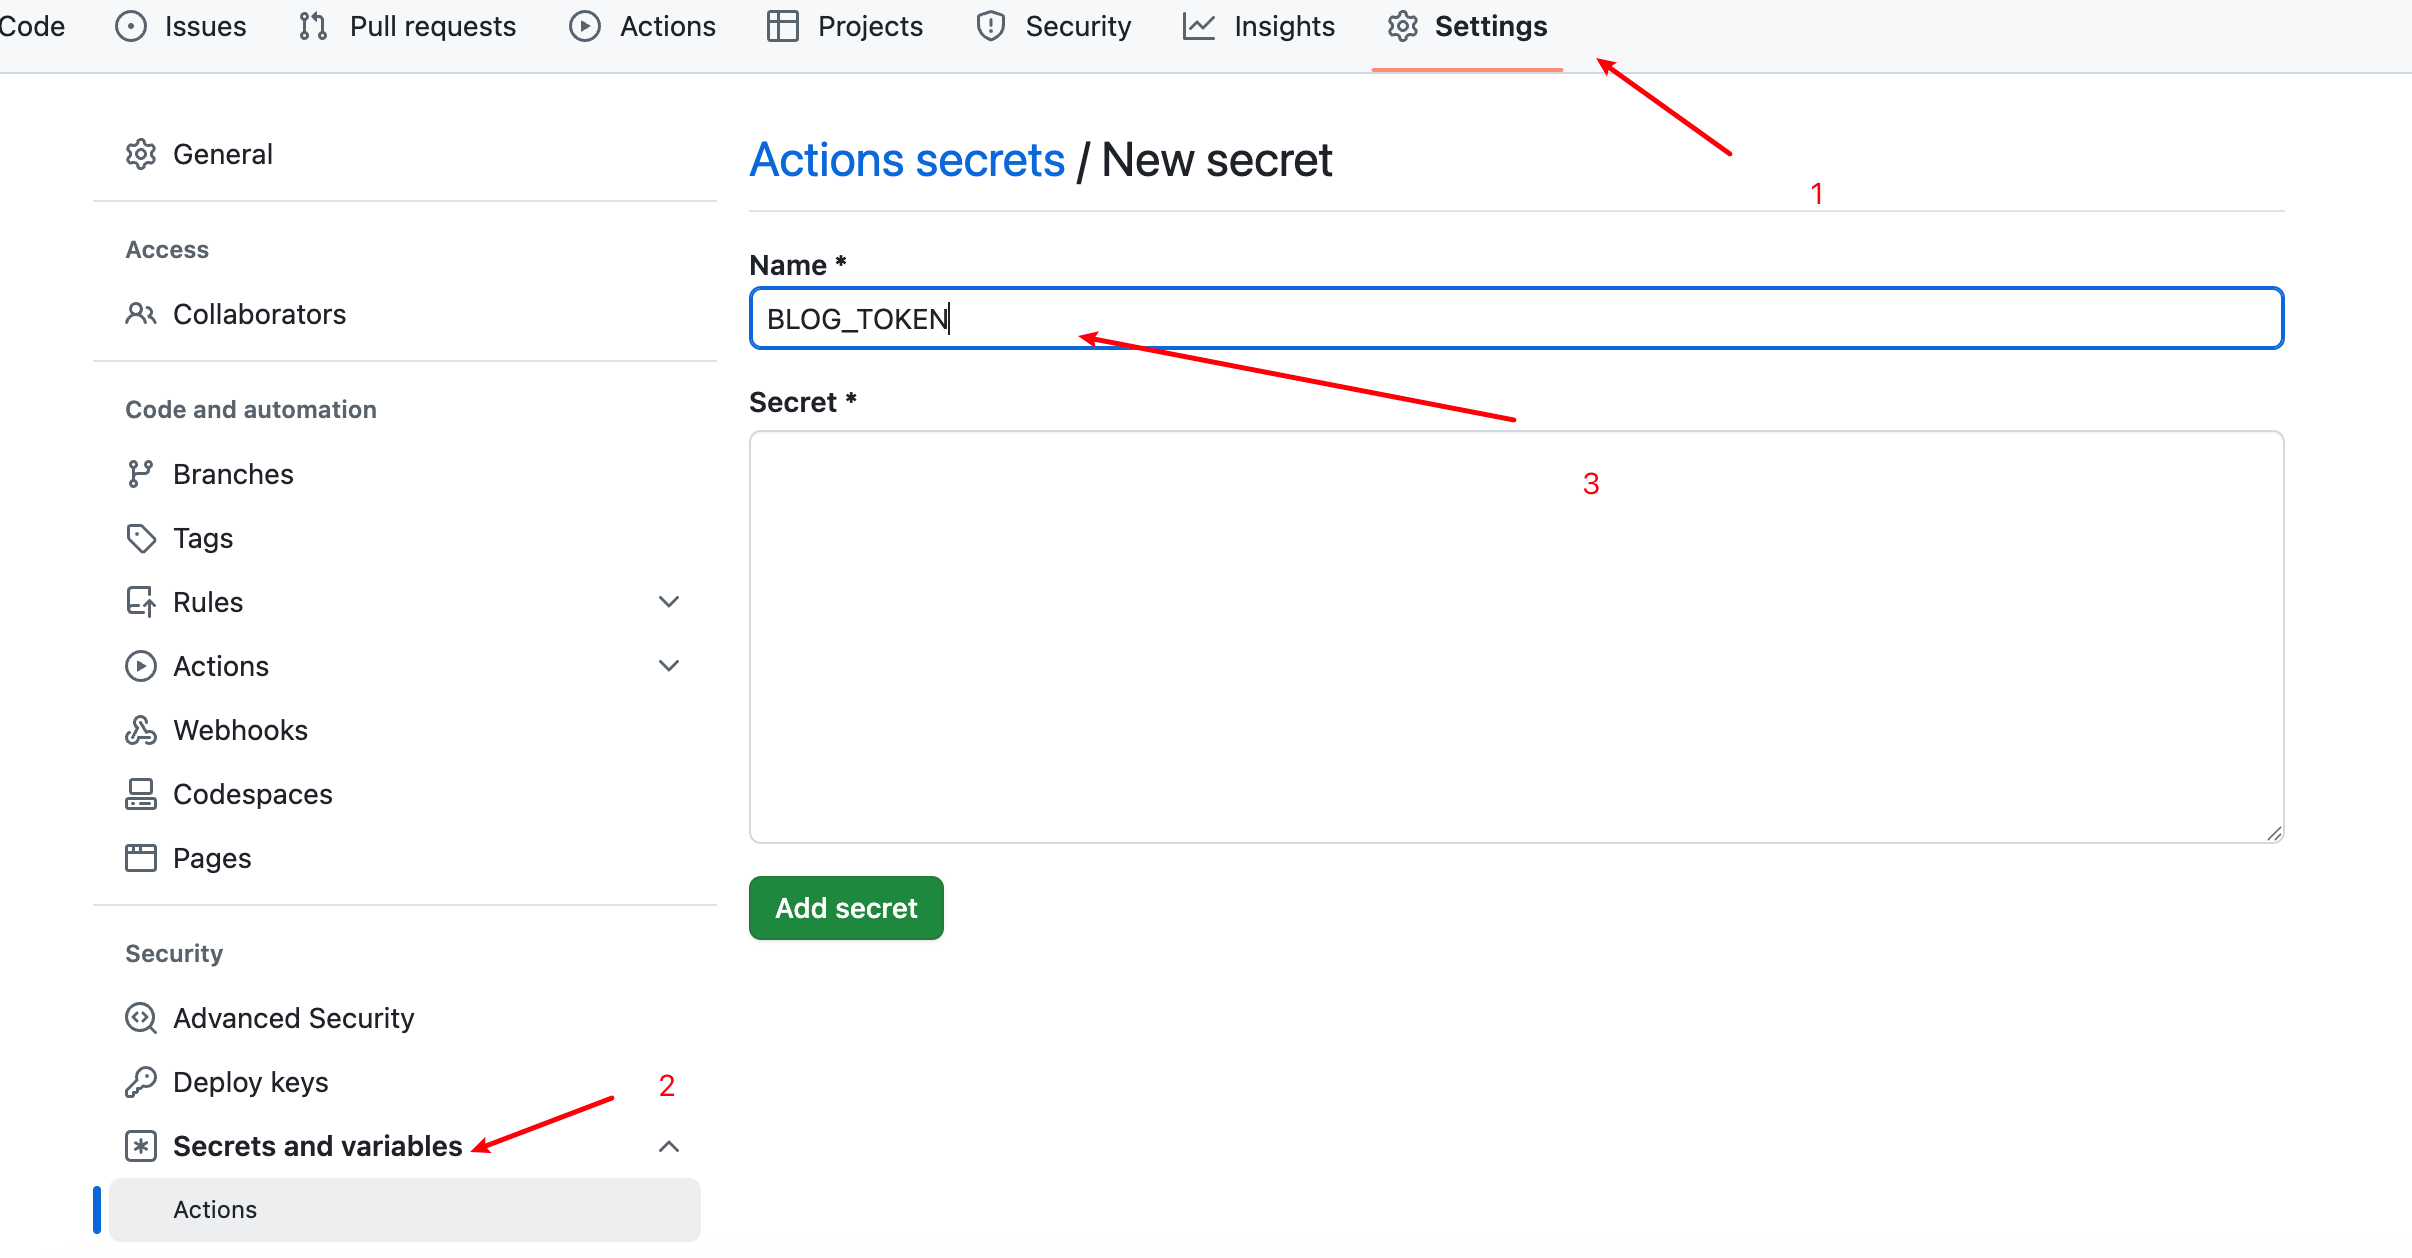
创建 token,然后将 token 添加到 private 仓库的环境变量当中去
使用 git 管理本地的 blog 项目
在博客根目录中创建 .github/workflows/ 文件夹(可参考 Github 的 Workflow 有关内容),然后添加一个 yaml 文件,内容如下:
name: deploy

# 代码提交到main分支时触发github action
on:
  push:
    branches:
      - main

jobs:
  deploy:
    runs-on: ubuntu-latest                                      # 在什么环境执行
    steps:                                                      # 步骤
        - name: Checkout                                        # 第一步 Checkout
          uses: actions/checkout@v4
          with:
              fetch-depth: 0

        # - name: Update Submodule                                # 第二步 更新子模块
        #   run: git submodule update --init --recursive

        - name: Setup Hugo                                      # 第三步 Hugo 配置
          uses: peaceiris/actions-hugo@v3
          with:
              hugo-version: '0.144.2'                           # 使用的 Hugo 版本
              extended: true                                    # 是否使用 extended 版本

        - name: Build Web                                       # 第四步 构建
          run: hugo -D                                          # 构建命令

        - name: Deploy Web                                      # 第四步 发布
          uses: peaceiris/actions-gh-pages@v4
          with:
              PERSONAL_TOKEN: ${{ secrets.你的KEY名称 }}
              EXTERNAL_REPOSITORY: 你的Github帐号/你的Github帐号.github.io
              PUBLISH_BRANCH: main
              PUBLISH_DIR: ./public
              commit_message: auto deploy
注意修改一下几点
- hugo-version:修改你自己的版本,是否使用 extended
- 如果定制主题后不想动态更新,也可以去掉第二步,本地也去掉 Submodule。
PERSONAL_TOKEN指的是在hugo_demo_quickstart中配置的 Sercet 名称,不是 Token 本身,注意只要把“你的 KEY 名称”替换即可,“$ {{ secrets.xx }} ”格式保持不变。
迁移到 mkdocs
为了把笔记也加上去,就又改用 mkdocs 了。因为笔记是采用 markdown 方式记录的,但是 Hugo 需要在 md 文件添加元数据,mkdocs 可以不用添加,所以就改为用 mkdocs 了。
1、本地安装使用
需要 Python 环境和 pip,自行安装即可
# 安装mkdocs,使用第三方镜像源快一点
pip3 install -i https://pypi.tuna.tsinghua.edu.cn/simple mkdocs

# 安装主题。使用 material 主题
pip install mkdocs-material
初始化项目
mkdocs new mytest
cd mytest
# 在mytest文件夹下有 mkdocs.yml 的配置文件
mkdocs.yml 文件配置
site_name: 蓝狐狸 | 笔记
theme:
    name: material  # 启用第三方主题
    language: zh    # 设置网站语言为中文
    palette:
    # 亮色和暗色主题切换
        - scheme: default  # 亮色主题
          toggle:
            icon: material/weather-sunny  # 按钮样式
            name: Switch to dark mode
          primary: blue         # 主题配色
          accent: blue         # 滚动条、按钮、链接等配色

        - scheme: slate  # 暗色主题
          toggle:
            icon: material/weather-night
            name: Switch to light mode
          primary: black
          accent: deep purple

    logo: assets/author.jpg            # 更改用户图标
    favicon: assets/favicon-32x32.png  # 更改网站图标

    features:
        - navigation.top       # 返回顶部按钮
        - content.code.copy    # 启用代码块复制按钮

# 代码块颜色高亮
markdown_extensions:
    - pymdownx.highlight:
        anchor_linenums: true
        use_pygments: true
    - pymdownx.superfences
    - pymdownx.highlight
    - pymdownx.inlinehilite

# 额外样式
extra_css:
 - stylesheets/extra.css    # 内容区域始终延伸到可用的屏幕空间
2、可以使用 docker 部署
docker run --rm -itd -p 8000:8000 -v /opt/mkdocs:/docs registry.cn-hangzhou.aliyuncs.com/lanhuli/mkdocs-material:9.6.15

# 编译静态文件
docker run --rm -it -v /opt/mkdocs:/docs registry.cn-hangzhou.aliyuncs.com/lanhuli/mkdocs-material:9.6.15 build
3、推送到远程服务器
使用 rsync 将内容推送到服务器,然后使用 docker 版本的 mkdocs 进行 build,通过 Nginx 访问生成的静态网站。
本地的文件目录结构如下,将 mkdocs 目录里的内容推送到服务器
mkdocs/
├── docs/
│   ├── assets/
│   │   └── author.jpg
│   ├── stylesheets/
│   │   └── extra.css
│   ├── 我的笔记/
│   │   ├── 网络基础/
│   │   │   └── aaa.md
│   │   └── 编程/
│   │       └── bbb.md
│   └── index.md
└── mkdocs.yml
设置定时任务,每天自动运行rsync 命令
# 使用rsync同步到远程服务器上面,同时排除一些不必要的文件夹
rsync -a --delete --exclude={'docs/我的笔记/.obsidian','docs/我的笔记/.trash','docs/我的笔记/.stignore','docs/我的笔记/.stfolder'} /srv/share/mkdocs/ root@8.140.21.107:/opt/mkdocs;

# 通过ssh执行命令
# 这是一个python脚本,为了解决 mkdocs在解析代码块时候,因为obsidian在代码块添加 fold 字段,从而导致页面格式混乱的问题
ssh root@8.140.21.107 "python3 /opt/mkdocs/remove_fold.py --docs-dir /opt/mkdocs/docs";

# 在服务器上 build
ssh root@8.140.21.107 "docker run --rm -it -d -v /opt/mkdocs:/docs registry.cn-hangzhou.aliyuncs.com/lanhuli/mkdocs-material:9.6.15 build"

# crontab写入
30 1 * * *  rsync -a --delete --exclude={'site','docs/我的笔记/.obsidian','docs/我的笔记/.trash','docs/我的笔记/.stignore','docs/我的笔记/.stfolder'} /srv/share/mkdocs/ root@8.140.21.107:/opt/mkdocs;ssh root@8.140.21.107 "python3 /opt/mkdocs/remove_fold.py --docs-dir /opt/mkdocs/docs";ssh root@8.140.21.107 "docker run --rm -it -d -v /opt/mkdocs:/docs registry.cn-hangzhou.aliyuncs.com/lanhuli/mkdocs-material:9.6.15 build"
Nginx 配置
# mkdocs网页版
server {
       listen 8000 ssl;
       server_name x.x.x.x;

       root /opt/mkdocs/site;
       index index.html;

       ssl_certificate /opt/ssl_zhengshu/cert.pem;
       ssl_certificate_key /opt/ssl_zhengshu/private.key;

       auth_basic  "请输入账号和密码";
       auth_basic_user_file    /opt/nginx_passwd;

       # 强制跳转https
       error_page 497 https://$host:8000$request_uri;

       location / {
               try_files $uri $uri/ =404;
       }
}
设置定时任务,自动同步
# 将这条命令写入 crontab里面,每天执行即可
rsync -a --delete --exclude={'site','docs/我的笔记/.obsidian','docs/我的笔记/.trash','docs/我的笔记/.stignore','docs/我的笔记/.stfolder'} /srv/share/mkdocs/ root@8.140.21.107:/opt/mkdocs;ssh root@8.140.21.107 "python3 /opt/mkdocs/remove_fold.py --docs-dir /opt/mkdocs/docs";ssh root@8.140.21.107 "docker run --rm -it -d -v /opt/mkdocs:/docs registry.cn-hangzhou.aliyuncs.com/lanhuli/mkdocs-material:9.6.15 build"
# 注意事项
# 需要配置服务器免密登录
# docker版本的mkdocs-material运行时需要加上 -d 参数,不然报错:the input device is not a TTY
# remove_fold.py 脚本放在了docs同级目录下
remove_fold.py 脚本内容
import re
import os
import argparse

def process_markdown_files(docs_dir):
    """
    处理Markdown文件中的代码块折叠语法,只移除fold关键字。这个脚本会精确地只移除代码块开头的 fold 关键字,不会做任何其他修改
    使用方法:python3 remove_fold.py --docs-dir your_docs_directory
    如果不指定 --docs-dir 参数,默认会处理当前目录下的 docs 文件夹
    """
    # 匹配形如 ```language fold 的代码块开始标记
    # 这个正则表达式会匹配: 三个反引号 + 语言标识 + 空格 + "fold"关键字
    pattern = r'^(`{3,})(\w+)\s+fold\s*$'

    # 统计处理情况
    processed_files = 0
    processed_blocks = 0

    # 遍历docs目录
    for root, dirs, files in os.walk(docs_dir):
        for file in files:
            if file.endswith('.md'):
                file_path = os.path.join(root, file)

                with open(file_path, 'r', encoding='utf-8') as f:
                    content = f.read()

                # 使用正则表达式替换,只移除fold关键字
                new_content, count = re.subn(
                    pattern,
                    r'\1\2',  # 只保留反引号和语言标识
                    content,
                    flags=re.MULTILINE
                )

                if count > 0:
                    # 写回文件
                    with open(file_path, 'w', encoding='utf-8') as f:
                        f.write(new_content)

                    processed_files += 1
                    processed_blocks += count
                    print(f"处理文件: {file_path}, 移除了 {count} 个fold关键字")

    print(f"\n处理完成! 共处理 {processed_files} 个文件, {processed_blocks} 个代码块")

if __name__ == "__main__":
    parser = argparse.ArgumentParser(description='移除Markdown代码块中的fold关键字')
    parser.add_argument('--docs-dir', default='docs', help='Markdown文件所在目录 (默认为当前目录下的docs文件夹)')

    args = parser.parse_args()

    # 检查目录是否存在
    if not os.path.exists(args.docs_dir):
        print(f"错误: 目录 '{args.docs_dir}' 不存在!")
        exit(1)

    process_markdown_files(args.docs_dir)