XSS 平台
项目地址: https://github.com/firesunCN/BlueLotus_XSSReceiver
推荐: http://oss.lanhuli.top/install_bluelotus_xss.sh 使用这个脚本安装 docker 镜像,内容如下
#! /bin/bash
# 这里映射宿主机的80端口,其它端口有问题,admin.php页面会不断刷新。80端口就没事
docker run -d -p 80:80 --restart=always --name=bluelotus1 registry.cn-hangzhou.aliyuncs.com/lanhuli/php:5.6-apache
# 下载源码
docker exec bluelotus1 curl -O http://oss.lanhuli.top/bluelotus_xss.tar.gz
# 解压
docker exec bluelotus1 tar -xzf bluelotus_xss.tar.gz
# 赋予权限
docker exec bluelotus1 chmod 777 -R /var/www/html
以下方式不推荐
自己做成了一个 docker 镜像,可以直接使用。(镜像太大,不要使用)
docker pull bluefoxqaq/bluelotus_xss_docker:2.0
# 这里映射宿主机的80端口,其它端口有问题,admin.php页面会不断刷新。80端口就没事
docker run -d -p 80:80 -it --name=bluelotus bluefoxqaq/bluelotus_xss_docker:2.0
# 访问ip:80即可
登录时需要完整的地址,例如:http://ip/login.php,这个·login.php不会自动添加。
镜像制作过程
下载所需要的文件,解压后是个名为 xcc 的文件夹,进入 xcc 文件夹,运行 docker build 命令
docker build -f ./Dockerfile -t bluelotus_docker:1.0 . # 注意后面的点号
所需文件下载地址:xcc 。其中 Dockerfile 文件内容如下:
FROM debian:9.4

# 上传apt源配置
COPY ./sources.list /etc/apt/sources.list
# 安装Nginx
RUN apt update ; apt install nginx -y
# 上传Nginx配置
COPY mynginx.conf /etc/nginx/sites-enabled/default

# 上传php源码
COPY php-5.6.4 /root/php-5.6.4
WORKDIR /root/php-5.6.4
RUN apt install gcc make libxml2 libxml++2.6-dev -y # 安装编译工具
RUN mkdir /usr/local/php&&mkdir /usr/local/php/5.6  # 创建安装目录
RUN ./configure --prefix=/usr/local/php/5.6 --with-config-file-path=/usr/local/php/5.6 --enable-fpm --enable-cli  # php安装脚本
RUN make && make install  # 编译安装
RUN cp php.ini-production /usr/local/php/5.6/php.ini&&cp ./sapi/fpm/init.d.php-fpm /etc/init.d/php5.6-fpm&&chmod +x /etc/init.d/php5.6-fpm
# 上传php-fpm.conf
COPY php-fpm.conf /usr/local/php/5.6/etc/php-fpm.conf
RUN groupadd nobody  # 添加nobody组

# 上传网址源码
RUN rm -r /var/www/html
COPY bluelotus /var/www/html
RUN chmod -R 777 /var/www/html

EXPOSE 80

#启动Nginx和php
COPY start_nginx_php.sh /root/start_nginx_php.sh
WORKDIR /root/
RUN chmod 777 /root/start_nginx_php.sh
CMD ["sh","-c","./start_nginx_php.sh"]
docker cp xx c75945d9081e:/etc/apt/sources.list
docker cp php-5.6.4 c75945d9081e:/root/php-5.6.4
apt update
apt install nginx -y    # 安装Nginx


# 将源码上传
rm /var/www/html/*
docker cp bluelotus/ c75945d9081e:/var/www/html/
cp -r /var/www/html/bluelotus/* /var/www/html/&&rm -r /var/www/html/bluelotus
chmod -R 777 /var/www/html

# nginx配置文件
docker cp mynginx.conf c75945d9081e:/etc/nginx/sites-enabled/mynginx.conf


workdir /root/php-5.6.4

apt install gcc make libxml2 libxml++2.6-dev -y    # 安装php编译工具

mkdir /usr/local/php&&mkdir /usr/local/php/5.6

# php安装脚本
./configure --prefix=/usr/local/php/5.6 --with-config-file-path=/usr/local/php/5.6 --enable-fpm --enable-cli

# 编译安装
make && make install


# 复制
cp php.ini-production /usr/local/php/5.6/php.ini&&cp ./sapi/fpm/init.d.php-fpm /etc/init.d/php5.6-fpm&&chmod +x /etc/init.d/php5.6-fpm

# 复制php-fpm.conf

# 添加
groupadd nobody

/etc/init.d/php5.6-fpm start  # 启动php
service nginx start    # 启动nginx
/etc/init.d/php5.6-fpm start&&service nginx start
# 复制nginx配置文件
/etc/nginx/sites-enabled/default  # 这是个连接
DNS log 平台
项目地址: https://github.com/lanyi1998/DNSlog-GO
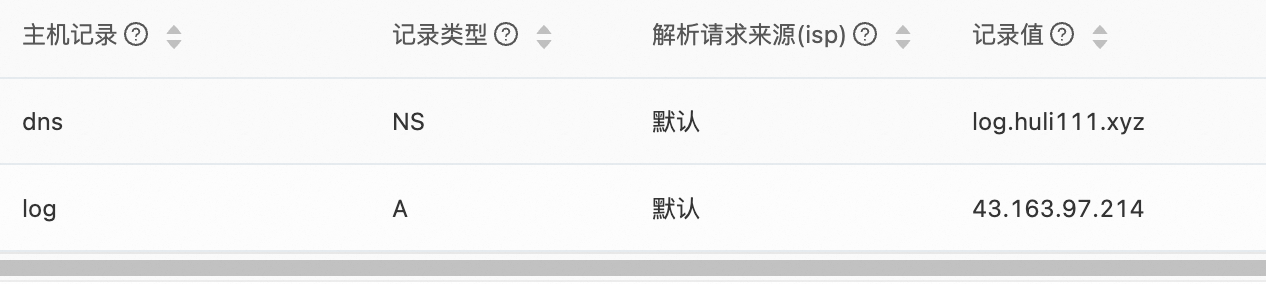
准备一个阿里云的域名:huli111.xyz,一台公网服务器:43.163.97.214
添加一条 A 记录:将 log.huli111.xyz 指向服务器的 IP。然后再添加一条 NS 记录,将 dns.log.huli111.xyz 指向 log.huli111.xyz
主机记录值可以随意填写,但是不要搞错指定关系
使用 docker 搭建
wget https://raw.githubusercontent.com/lanyi1998/DNSlog-GO/master/config.yaml
#修改你的config.yaml文件
docker run -d --restart=always -p 53:53 -p 53:53/udp -p 8000:8000 -v `pwd`/config.yaml:/DNSlog-GO/config.yaml --name dnslog --privileged lanyi1998/dnslog-go:latest
记得要开启服务器的 53(tcp/udp)和 8000 端口。
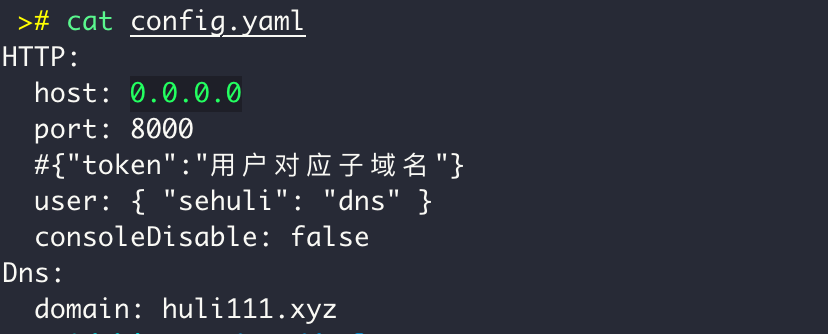
config.yaml 文件内容
HTTP:
  port: 8000 //http web监听端口
  #{"token":"用户对应子域名"}  //其中,token 是访问 web 页面的密码
  user: { "admin": "admin" } //用户admin 对应的dnslog子域名是 admin.demo.com
  consoleDisable: false  //是否关闭web页面
Dns:
  domain: demo.com //dnslog域名
HFish 蜜罐
下载安装: https://hfish.net/#/
httpwaf
安装:git clone https://gitee.com/httpwaf/httpwaf.git
chmod +x ./himonitor
./himonitor
启动运行: ./himonitor
后台模式运行: ./himonitor daemon
停止运行: ./himonitor stop
卸载 : rm /hihttps/ -rf
默认没加开机启动,请自行把 himonitor 加入服务器开机启动程序
靶场环境搭建
oracle 数据库靶场搭建
参考: https://blog.csdn.net/AomCC/article/details/134965130
docker pull registry.cn-hangzhou.aliyuncs.com/lanhuli/oracle-11g:latest  # 下载oracle11g镜像
docker run -d -p 11521:1521 -p 10022:22 -p 18080:8080 -e ORACLE_ALLOW_REMOTE=true --name=oracle11g registry.cn-hangzhou.aliyuncs.com/lanhuli/oracle-11g:latest

# web环境下载,直接使用php-apache-oracle镜像,拆箱即用
docker pull registry.cn-hangzhou.aliyuncs.com/lanhuli/apache-php-oracle:latest
docker run --name=apache-php-oracle --restart=always -p 8080:80 -d -v /var/www/html:/var/www/html registry.cn-hangzhou.aliyuncs.com/lanhuli/apache-php-oracle:latest
在 /var/www/html 目录下新建 test.php
<?php
$username = 'system';  // 数据库用户
$password = 'oracle';  // 数据库密码
$connectText = '//192.168.31.212:11521/XE';  # ip地址
$conn = oci_connect($username, $password, $connectText);
if (!$conn) {
    $e = oci_error();
    echo 'Oracle connect failed <br />';
    exit($e['message']);
}
echo 'Oracle connect ok'."<br>";
?>
访问 http://192.168.31.212/test.php,出现 Oracle connect ok 即成功
连接数据库,创建 user 表
-- 创建表
 CREATE TABLE users (
     id number,
     name varchar(500),
     surname varchar(1000)
 );

 INSERT INTO users (id, name, surname) VALUES (1, 'luther', 'blisset');
 INSERT INTO users (id, name, surname) VALUES (2, 'fluffy', 'bunny');
 INSERT INTO users (id, name, surname) VALUES (3, 'wu', 'ming');
 INSERT INTO users (id, name, surname) VALUES (4, 'sqlmap/1.0-dev (http://sqlmap.org)', 'user agent header');
 INSERT INTO users (id, name, surname) VALUES (5, NULL, 'nameisnull');
 commit;
-- 查询user表
select * from users;
在 /var/www/html 目录下新建 sql.php
 <?php
 $username = 'system';
 $password = 'oracle';
 $connectText = '//192.168.31.212:11521/XE';
 $conn = oci_connect($username, $password, $connectText);
 if (!$conn) {
     $e = oci_error();
     echo 'Oracle connect failed <br />';
     exit($e['message']);
 }
 echo 'Oracle connect ok' . "<br>";
 // Prepare the statement
 if (!isset($_GET['id']) || $_GET['id'] == null) {
     echo "oracle sqlinjection test: oracle_test.php?id=1</br>";
     $stid = oci_parse($conn, "select * from USERS");
 } else {
     //SQL injection!!!!!!
     $stid = oci_parse($conn, "SELECT * FROM users where id=" . $_GET['id']);
 }
 if (!$stid) {
     $e = oci_error($conn);
     exit($e['message']);
 }
 // Perform the logic of the query
 $r = oci_execute($stid);
 if (!$r) {
     $e = oci_error($stid);
     exit($e['message']);
 }
 // Fetch the results of the query
 print "<table border='1'>\n";
 while ($row = oci_fetch_array($stid, OCI_ASSOC+OCI_RETURN_NULLS)) {
     print "<tr>\n";
     foreach ($row as $item) {
         $item = ($item !== null ? mb_convert_encoding($item, 'utf-8', 'gbk') : " ");
         print "    <td>" . $item . "</td>\n";
     }
     print "</tr>\n";
 }
 print "</table>\n";
 oci_free_statement($stid);
 oci_close($conn);
 ?>
访问 http://192.168.31.212/sql.php,如下图

WebGoat
项目地址: https://github.com/WebGoat/WebGoat
docker 安装:使用 docker 安装方便,jar 包安装需要注意 java 版本(java 低版本不可用)
docker search webgoat # 搜寻镜像
docker pull webgoat/webgoat-8.0  # 拉取镜像
docker run --name webgoat -p 8080:8080 -it webgoat/webgoat-8.0 # 运行
访问地址: http://101.43.245.6:8080/WebGoat
参考: https://blog.csdn.net/qq_42620328/article/details/108392308
域环境搭建
前提准备
所有主机网络设置均为仅主机模式,子网 IP 为 192.168.17.0,所有主机 IP 均为静态 IP。所有主机防火墙尽可能关闭,否则可能导致无法通信。

主机配置
参考: https://blog.csdn.net/weixin_54977781/article/details/124089815 , 这篇文章也可以
域控:Windows server 2012 R 2
设置 IP 地址:192.168.17.17,子网掩码:255.255.255.0, DNS 服务器地址:192.168.17.17 。更改主机名称:DC-2012R2
域主机:win 7
设置 IP 地址:192.168.17.18,子网掩码:255.255.255.0, DNS 服务器地址:192.168.17.17 。更改主机名称:WIN7-64
注意:这里配置好后,域内机器是可以互相访问的,但是无法访问外网。如果需要域内机器访问外网,需进行其它的网络配置。
AD 域证书服务
DAC 动态访问控制: http://www.5dmail.net/html/2014-5-15/2014515121220.htm
域内机器上外网设置
这个参考不适用当前虚拟机环境搭建: https://www.cnblogs.com/dongcom/p/10440649.html
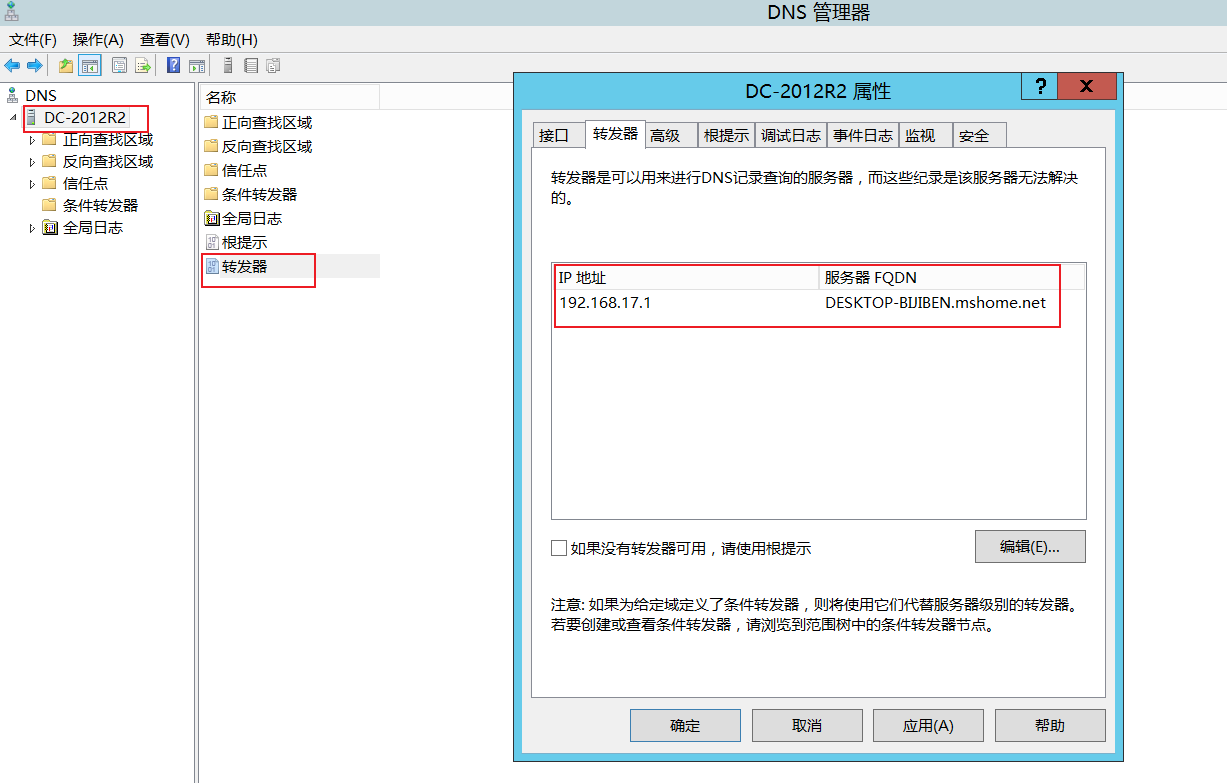
1)设置网络连接共享,点击确定,**他会把 VMnet 1 网卡的 ip 地址更改掉。然后我们再把 VMnet 1 改回 192.168.17.1
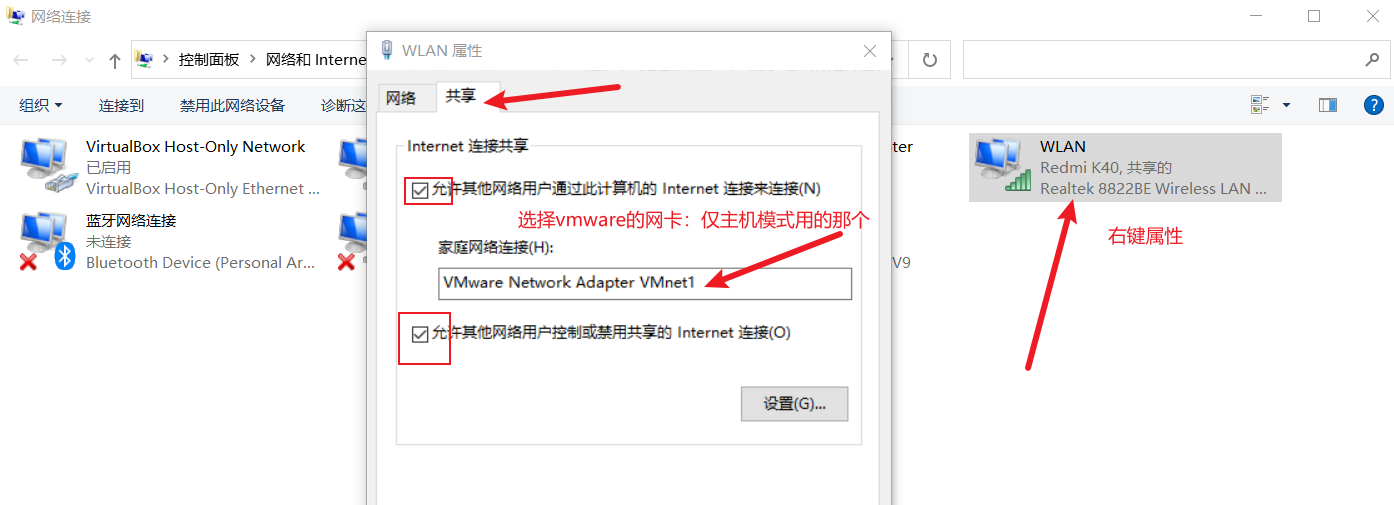
2)将==域控 AD== 的网关和 dns 服务器改为 192.168.17.1,也就是 VMnet 1 的地址。设置好后,域控就可以访问外网了。
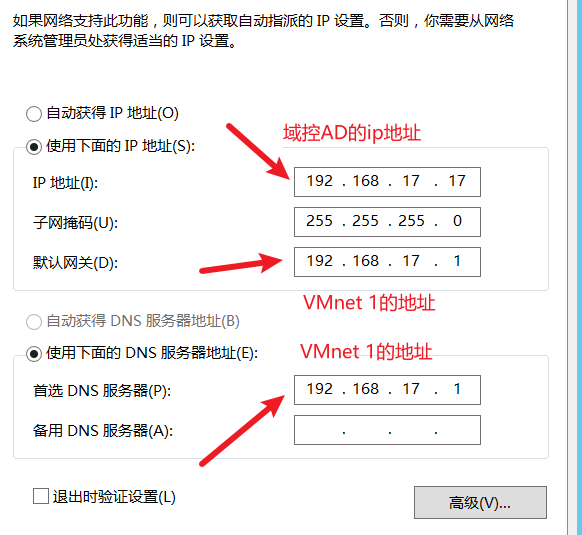
3)其它的域内机器需要访问外网只需要把网关设置为 VMnet 1 网卡的 ip 地址即可
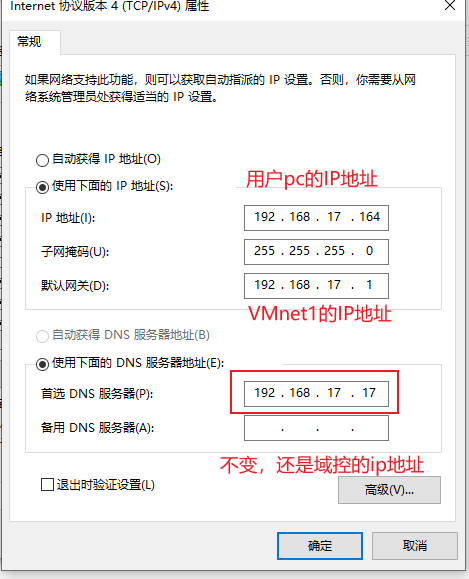
注意:用户 pc 的 DNS 服务器还是域控的 ip。因为我们在访问外网时(如 baidu.com),他会先进行 DNS 解析,将这个 DNS 请求发送给域控制器,域控制器在转发给 VMnet 1(192.168.17.1)。
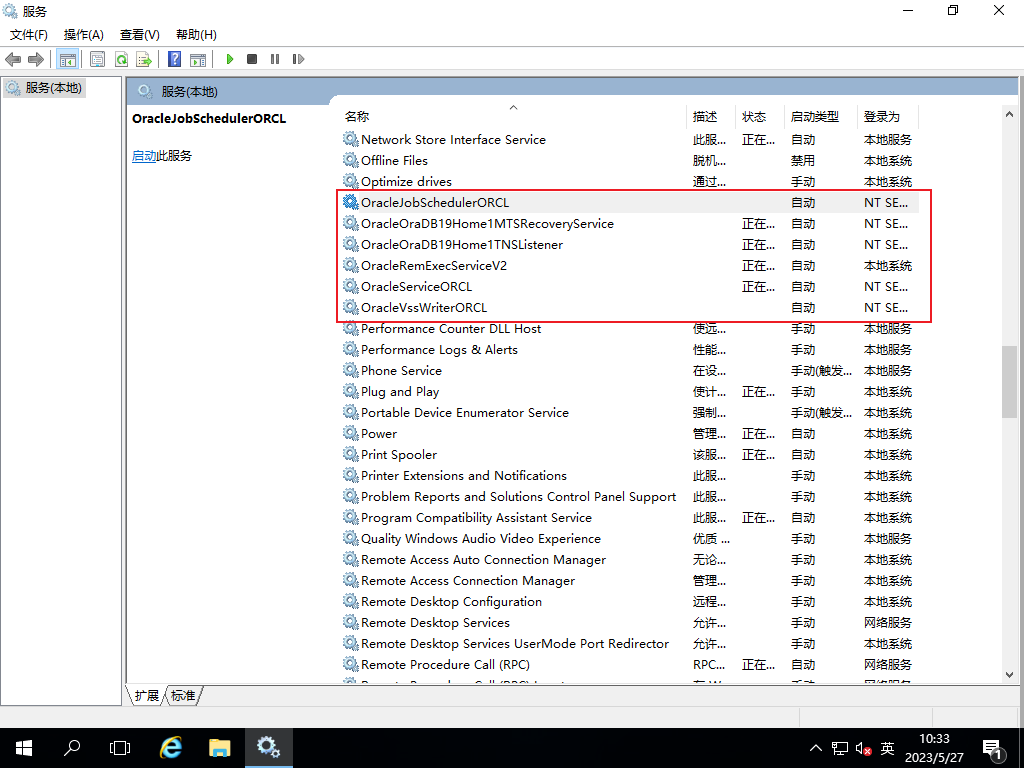
oracle 数据库安装
参考: https://blog.csdn.net/Evening_breeze_/article/details/113988231
数据库密码不要使用 @ 符号。
oracle 19 c 的各种服务: https://blog.csdn.net/weixin_41620184/article/details/107288411